- Contract Detail
|
Contract Name* |
Enter the name of the Contract. |
|
Contract Type* |
Select the Contract Type. Click to expand, or to collapse. Choose one from the list. |
|
Contract Template* |
Depending on the Contract Type selected, users can browse from the list to choose which Contract Template to use. Click to expand, or to collapse. If this option is not available, enter a name for the Contract. |
- Contract Content
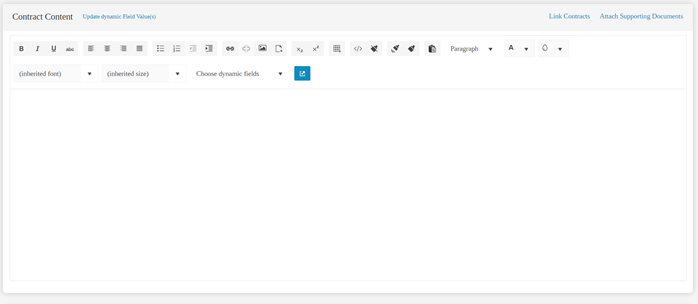
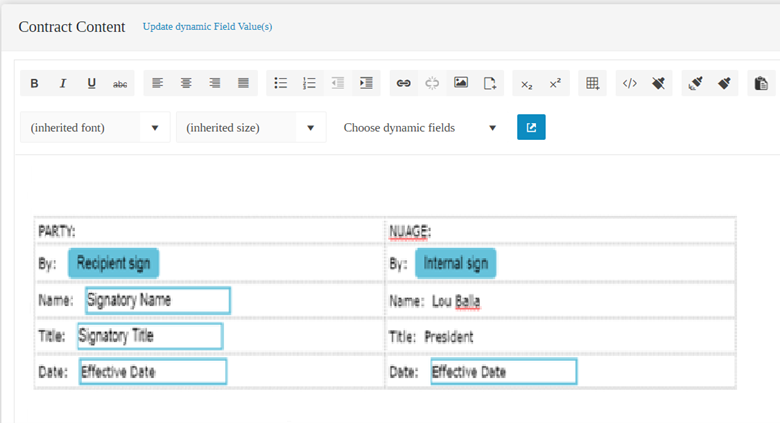
The format and content of the contract is contingent to the Contract Type and Template selected by the user on the Contract Detail section. The system will load the base format of the Contract Template. Once details and elements are inserted, users can then edit the Dynamic fields (see images shown below) and provide new values in the Contract.
Note: Dynamic Field’s new value(s) will be specific for the current contract only.
The number of Dynamic fields that need to be populated with proper information will depend on the setup or base format of the Contract Template. (See procedures to Create New Template located on the Template Module Section.)
- Updating the Contract’s Dynamic Field(s)
On the Contract Content section, users can update the contents of the Dynamic Fields to customize the new Contract.
To update the name of the Dynamic Field:
- On the Contract Content section, review the Dynamic Fields that need to be updated.
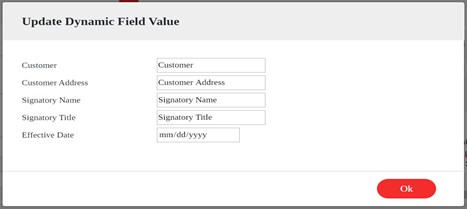
- On the Contract Header, users can go to “Update Dynamic Field Value(s)” to access all the Dynamic Field(s) on the contract or go to the first Dynamic Field on the content of the Contract to display the page below:
- Select the Dynamic Field(s) that needs to be updated.
- Change the value of the Dynamic Field(s).
- Select the Ok button once done.
- Verify on the Contract Content that the value of the dynamic field(s) changed.
- Attach Supporting Documents
Affixing additional documents that can support the Contract can also be accomplished during Contract creation. Users can use this feature if there is a need to include relevant documents to the new Contract.
To Attach a Supporting Document in a Contract:
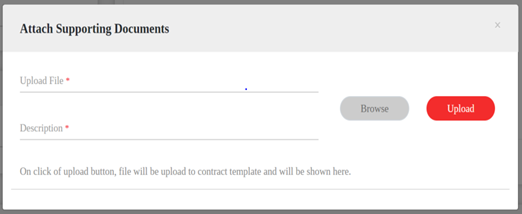
- Go to the Contract Content and navigate to “Attached Supporting Documents.” .
- On the next page (shown below), perform the following:
- Exit the page when the process is complete.
- View the Contract in PDF
In the Contract Content, users can view the contract in PDF. Click the link below to initiate the process:
Once the contract loads, users can review the structure and layout prior to finalizing the contract. Users can close the window after viewing the contract in PDF.
- Contract Status
Verify the status of the Contract:
- Active – default setting for setting up a new Contract.
- Inactive – select if the Contract is no longer or not yet active.
- Add New or Delete Metadata Field(s)
Users may opt to add or delete a Metadata Field(s) in the content of the new contract. As mentioned before, Metadata is used to provide information to identify other data.
To Add/Delete a Metadata Field to a Contract:
- In the Template, navigate to “New Metadata.”
Notes:
- The same as setting up a new Template, the Contract can also populate information using Metadata fields.
- Click the New Metadata button or the + sign by the Field Value to add.
- Users can add all the required Metadata in the Contract.
- Use the x sign to cancel or remove the setup.
- Setup the following information:
|
Field Name |
Click the to show the list. Select a Field Name from the list. |
|
Field Type |
Click the to show the list. Select a Field Type from the list. |
|
Field Description |
Enter a description for the field. |
|
Field Value* |
Enter a Field Value. |
- Add Workflow Assignee to a Contract
On the contract, users can assign the resources that can approve and sign the workflow.
- Navigate to the “Add Workflow Assignee” section.
- Select or verify the Action from the list. Click to see the list of workflows such as:
-
- Approver Workflow
- Internal E-Sign Workflow
- Recipient E-Sign Workflow
Note: Users can add a new workflow, if needed.
- Enter the Assignee Name for each Workflow.
- Enter the correct email for each Assignee.
- Notes
Notes can be added to the contract to write down quick thoughts or concepts as well as communications during the creation of the contract.
To add notes:
- Navigate to the Notes section of the Contract.
- Go to “Enter Notes Here” to start keying in the information.
- Once done, click Add Notes.
- Repeat the process for additional notes.
- Saving the Contract
Anapact provide other options prior to submitting the final Contract:
|
Cancel |
Choose this option to not save the settings that you have made. |
|
Preview |
Choose this option to see a preview of the contract. |
|
Save as Draft |
Choose this option to save the preliminary version of the Contract. This option allows the Contract to be visible on the Dashboard. Users can later select to continue working on the Contract. |
|
Submit |
Choose this option to save and submit the configured Contract for approval and signatures. |
Notes:
- Once the user chooses to “Submit” the Contract, the Workflow(s) associated with the Contract will start to initiate. (Need to test or verify)
- The Contract Template will change to its latest status on the Contract Dashboard.


